Dynamic VAT Management (DVM)
Dynamic VAT Management (DVM) enables automated VAT handling for sales performed on vessels, routes and legs that cross multiple VAT jurisdictions. The app adjusts VAT on POS transactions based on the currently active leg, so that sales are posted with the correct VAT posting groups in Business Central and LS Central.
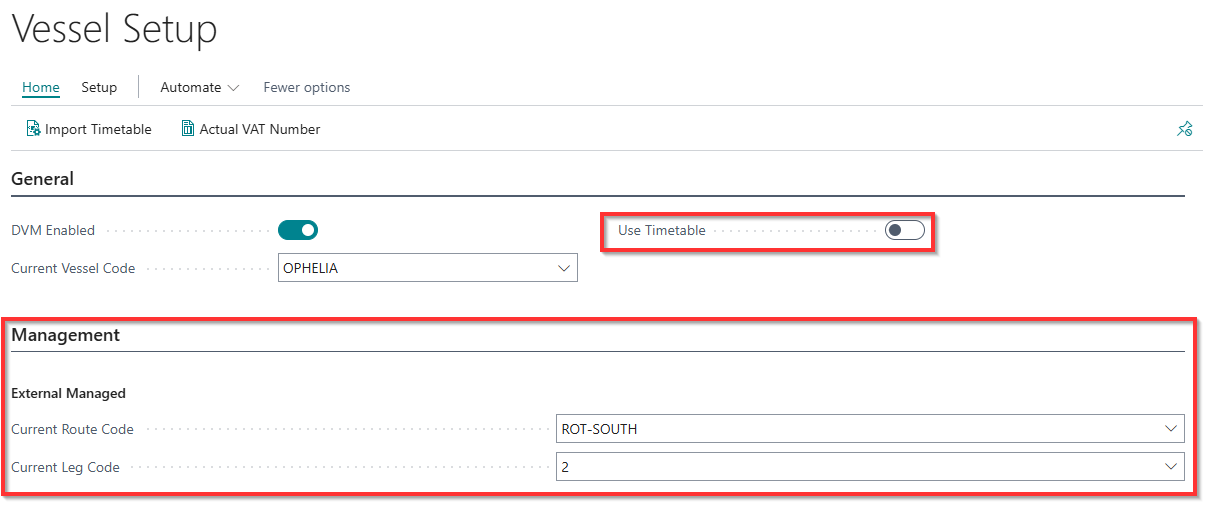
DVM can change legs relying on the Timetable, manually on POS by user who runs the command or by getting information about position from the External system.
This document describes the setup, daily usage and integration options for the DVM app.
Feature overview
| Feature | Description |
|---|---|
| Prerequisites, installation and setup | Describes how to install the DVM extension and perform the initial configuration. |
| Route and Leg definitions | Describes how to define vessels, routes and legs that are used as a basis for VAT calculation. |
| Timetable import and handling | Describes how to import timetables manually or via API and how they influence VAT changes. |
| Manual leg change on POS | Describes how to switch the active leg directly from POS by using a POS command/button. |
| External integration / API | Describes how DVM can receive leg and timetable information from external systems. |
| Monitoring and troubleshooting | Describes how to verify that VAT changes are processed correctly and how to handle errors. |
1. Installation and basic setup
1.1 Installation
In Business Central, open Extension Management.
- Ensure that the DVM app (Dynamic VAT Management) is available.
- Install the extension in the target environment (TEST/PROD).
- After installation, the DVM setup pages and lists become available in the search.
1.2 DVM Setup
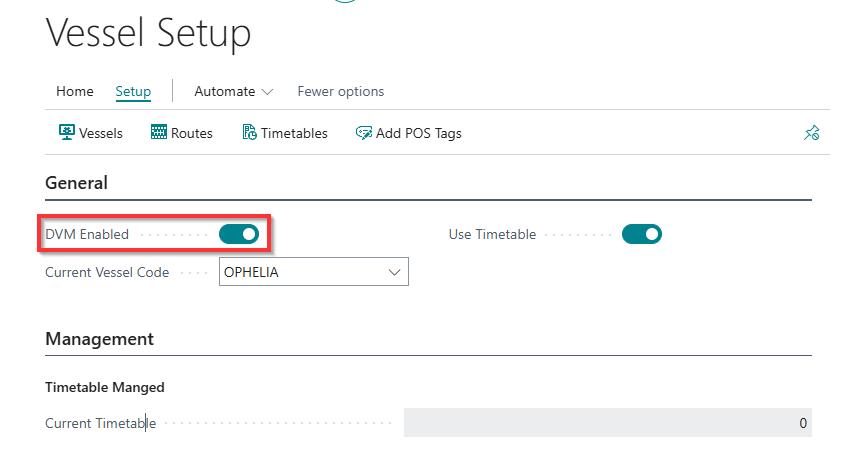
Open the DVM Setup page.
Populate the following fields:
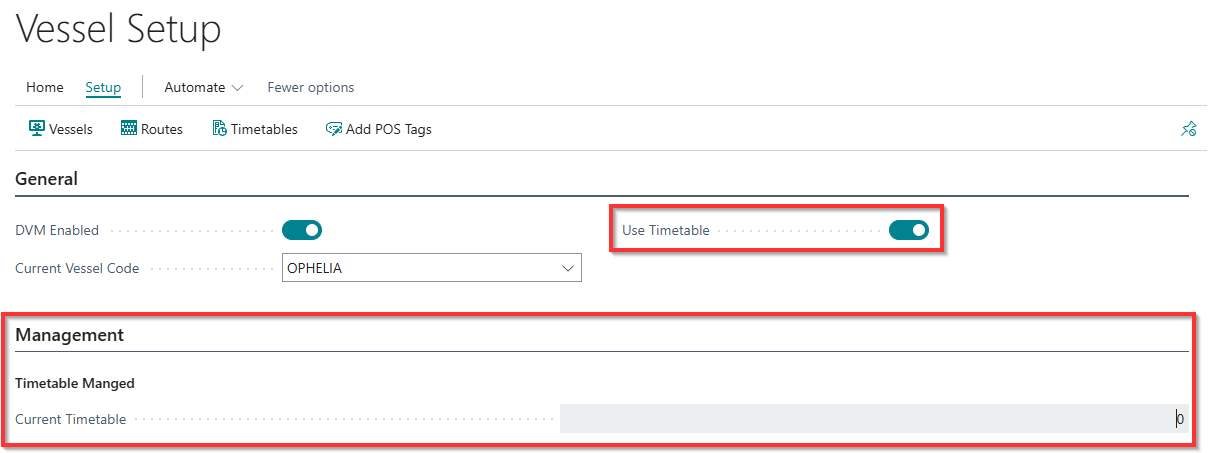
- Enable DVM – set to Yes to activate the functionality.
- Default Vessel – default vessel is set specific for and on each vessel database separately.
- Use Timetable – mark this field if you want to use timetable-based DVM changes.
1.3 Vessel, Route and Leg Definitions
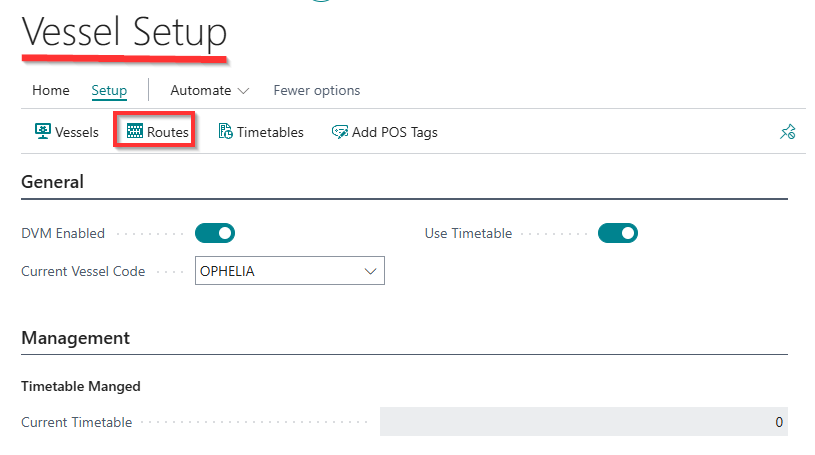
Before VAT can be calculated, you must define the hierarchy that DVM uses:
- Vessels – physical vessels or units on which POS devices operate.
- Routes – connections between ports/locations that the vessel travels.
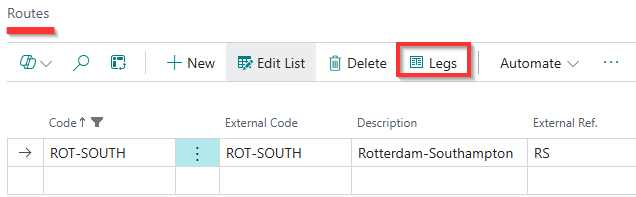
- Legs – individual segments of a route, each having its own VAT configuration.
Steps:
- Open the Vessels list and create a record for each vessel.
- Open Routes and create a route for every line on which the vessel sails.
- Open Legs and create legs for each route.
- For each leg, assign the route and set the sequence/order that reflects the real sailing order.
1.4 VAT Store Groups per Leg
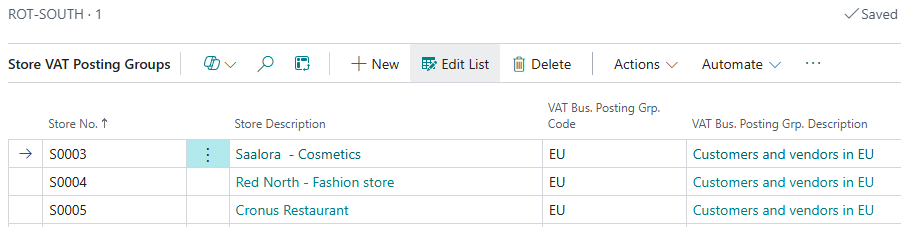
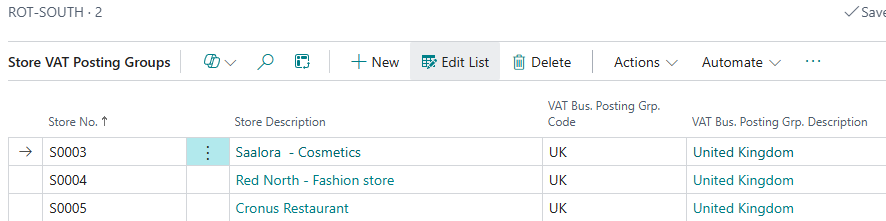
For every leg you must define which VAT Business Posting Group should be used when sales are performed on that leg.
For each leg you can:
- Define a default VAT Business Posting Group (without Store No.).
- Optionally define specific VAT Business Posting Groups per store to override the default.

1.5 POS / Store Setup
DVM uses the store (LS Central store/location) and the active leg to calculate VAT.
Make sure that:
- Stores are linked to the correct Business Central locations.
- POS terminals are assigned to the correct store and vessel.
- The DVM POS commands are available on the POS.
2. Timetable Import and Handling
This option is filled out only if DVM should use timetable for leg changes.
On the DVM Setup page, the Timetable in Use option should be enabled.
2.1 Timetable Structure
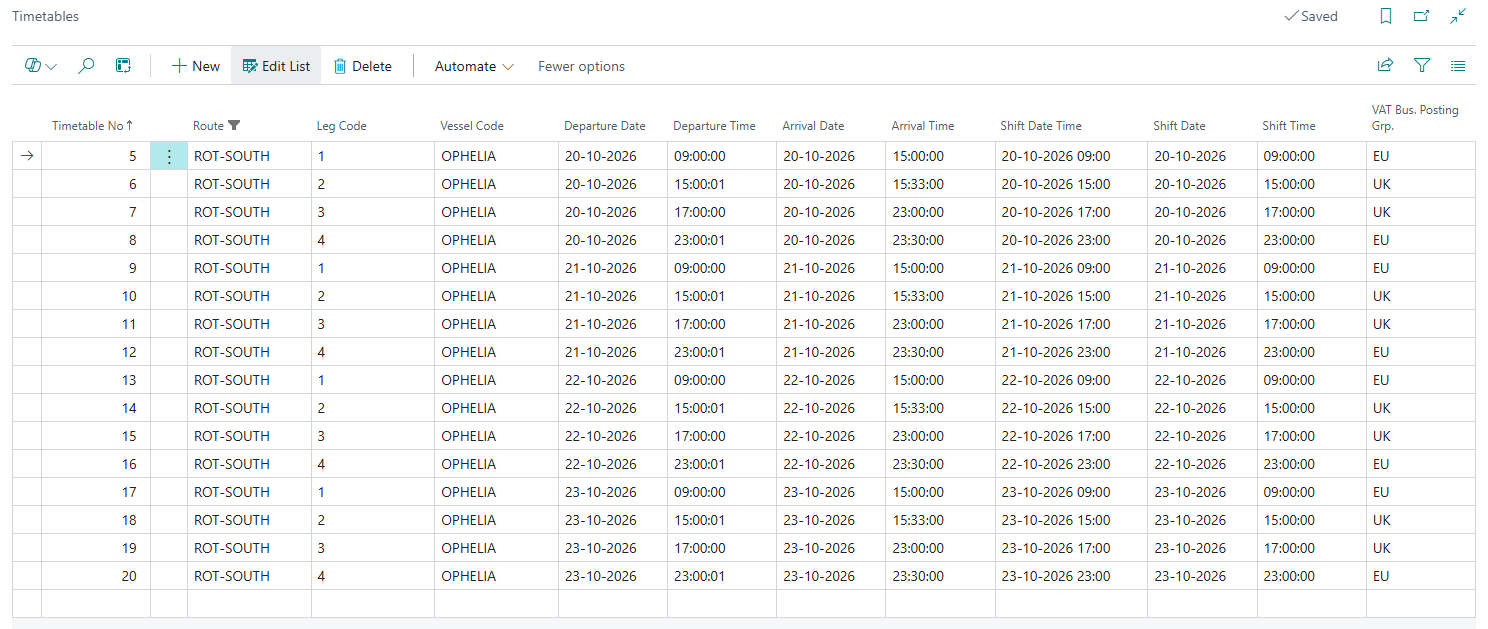
A timetable defines when a vessel is expected to be on a specific route and leg.
A timetable line usually contains:
- Vessel
- Route
- Leg
- Departure date and time
- Arrival date and time
- Optional shift date and time
- VAT Business Posting Group
2.2 Manual Timetable Import
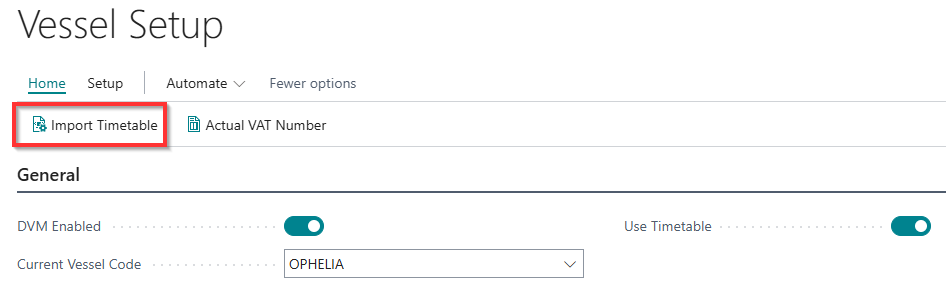
To import timetables manually:
- Open the DVM Timetable Import page.
- Choose Import.
- Select the file.
- Confirm the import.
All referenced vessels, routes and legs must already exist. Lines referring to non-existing codes are rejected during import.
2.3 Automatic Timetable Import (API / Job Queue)
In environments where the timetable is updated frequently, it is recommended to import it automatically via API.
- A web service or API endpoint receives timetable data from the external planning system.
- The data is written into the DVM timetable tables.
- A Job Queue entry runs on a schedule to process the imported timetable and update active legs.
Contact your partner or system integrator for the technical details of the API integration.
3. Route and Leg Handling During Operation
3.1 Determining the Active Leg
The active leg is the leg that DVM uses to calculate VAT at any given moment.
The active leg can be determined in one of the following ways:
- From the timetable.
- From an external system.
- Manually from POS.
3.2 Automatic VAT Switching from Timetable
If timetables are used, DVM periodically checks the timetable for each vessel and activates the leg that matches the current date and time.
When the active leg changes, DVM:
- Updates the active leg for the vessel.
- Creates a Job Queue entry that ensures all POS terminals receive the new VAT setting.
- Uses the VAT Store Group per Leg setup to determine the correct VAT Business Posting Group.
3.3 Example
Example:
Vessel FERRY01 sails from Port A to Port B with the following legs:
- Leg 10 – Port A → International waters (domestic VAT).
- Leg 20 – International waters → Port B (foreign VAT).
When the timetable indicates that the vessel entered Leg 20, DVM automatically changes the active leg to 20 and all subsequent POS sales are posted with the VAT Business Posting Group configured for Leg 20.
4. External Integration (API)
4.1 Overview
DVM can be integrated with external systems (for example traffic or planning systems) that control the current route and leg.
The external system can push leg changes into DVM instead of relying solely on timetables.
4.2 Typical Integration Flow
- External system determines that a vessel has changed leg.
- It calls a DVM API/web service with the vessel, route and leg.
- DVM validates the data and writes a leg-change request.
- The Job Queue processes the request and updates the active leg.
- POS terminals receive the new VAT setup.
4.3 Error Handling
If the external system sends an unknown vessel, route or leg, the request is rejected and logged.
Integration monitoring should check for failed leg-change requests and correct the master data or payload.
5. POS Commands
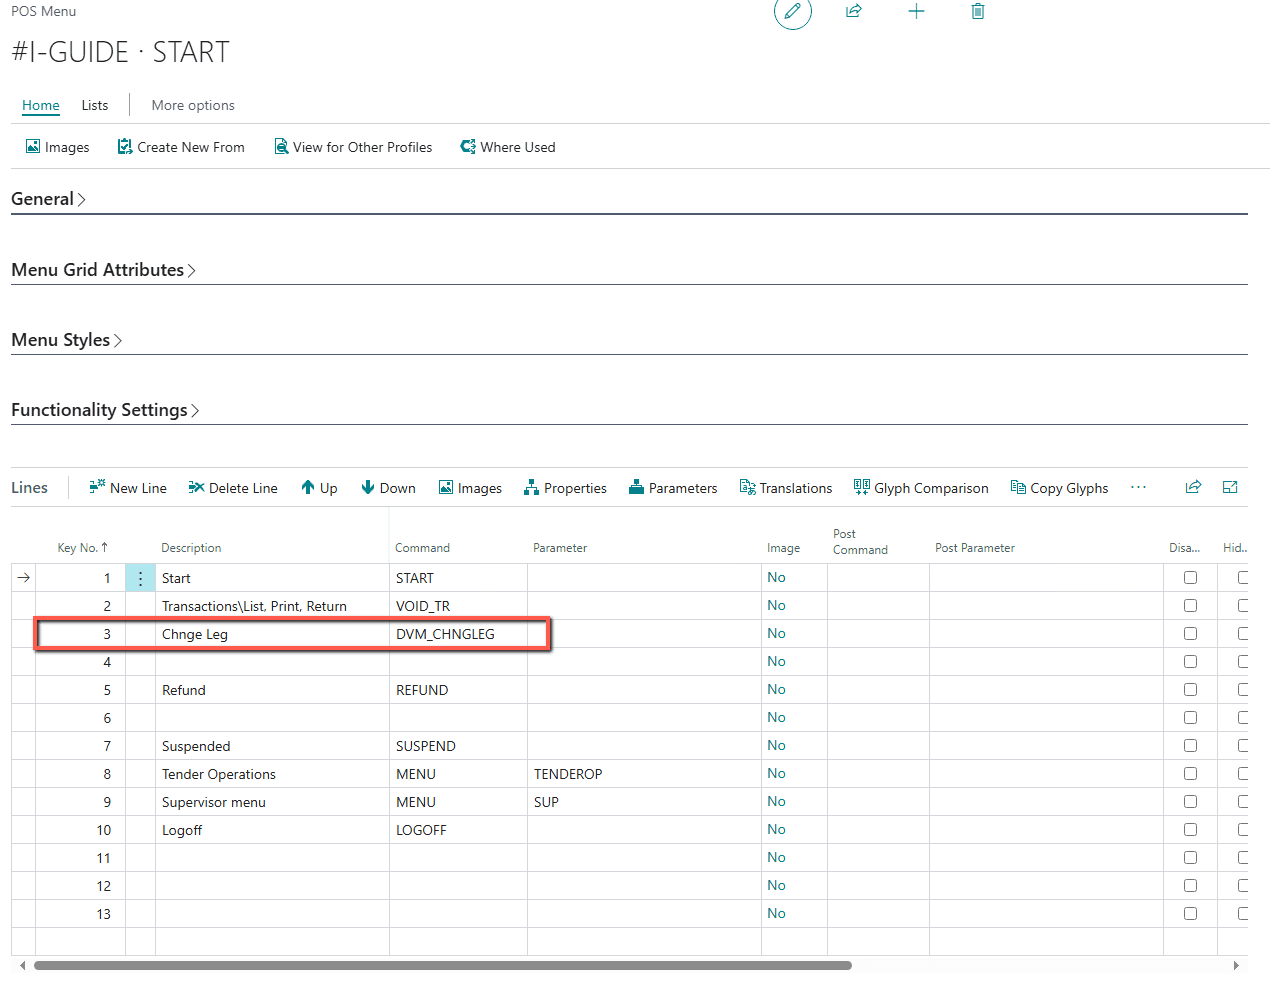
5.1 Manual Leg Change (DVM_CHNGLEG)
Users can manually change the active leg directly from POS.
Setup in LS Central POS:
- Open the POS Functions / Commands page.
- Create or locate the command DVM_CHNGLEG.
- Add a POS button and assign the command.
- Deploy the layout to the relevant POS terminals.
Usage:
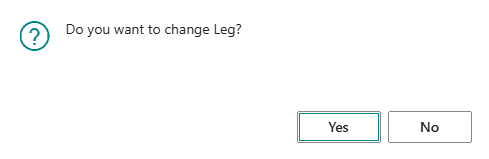
- The cashier presses the DVM_CHNGLEG button.
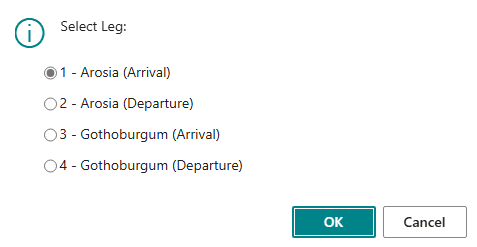
- A dialog opens showing available legs for the vessel.
- The cashier selects the required leg.
- DVM creates a leg-change job.
- The Job Queue processes the request.
- The active VAT setup is updated.
5.2 Other Commands (Optional)
Depending on the configuration, additional commands can be made available:
- Show the currently active leg on POS.
- Refresh VAT configuration from the back end.
These commands are optional and may vary by implementation.
6. Monitoring and Troubleshooting
6.1 Job Queue Monitoring
DVM relies on the Business Central Job Queue to process timetable imports, leg changes and VAT updates.
If VAT does not change as expected:
- Open Job Queue Entries and verify that DVM jobs are enabled and running.
- Check Job Queue Log Entries for errors.
- Correct any data issues and restart the job.
6.2 Typical Issues
VAT did not change when vessel entered a new leg
- Check that the timetable contains a line for the vessel, route and time.
- Verify that the leg has a VAT Store Group defined.
- Confirm that the Job Queue entry executed successfully.
POS shows the wrong VAT rate
- Check which leg is currently active.
- Verify the store mapping in VAT Store Group per Leg.
- Refresh the POS or restart the session.
Manual leg change from POS has no effect
- Confirm that the DVM_CHNGLEG command is configured correctly.
- Check Job Queue for failed leg-change jobs.
- Ensure the selected leg exists and is active.
6.3 Support Information
If the problem cannot be resolved, provide the following information when creating a support ticket:
- Environment (TEST/PROD) and Business Central / LS Central version.
- DVM version.
- Vessel, route and leg involved.
- POS document number and timestamp.
- Screenshots of Job Queue Entries and error messages.